I Received these clips last week and had let my hair get to the stage of needing a good cut. It is long, fine and can be quite straggly at times. I watched a couple of video clips on this Creaclip. I found it large enough for long hair and very easy to use. I used the smaller of the two first on my fringe, and also on the hair on either side of my face and it gave nice even shape to the sides. I then flipped my hair over my head to the front and bent over and used the larger clip to shape and cut all the uneven lengths at the back. It made a lovely job and sooo sooo easy to get the back all straight. I then used the large clip straight up and down around my head to get even more layers. I am thrilled to bits with these clips a very professional looking hair cut and so eay to use.
Vault
Max value reached
Adding this item would put you over your total vault limit of $250. please review your cart to stay under the limit.
Creaclip Creaclip set Review
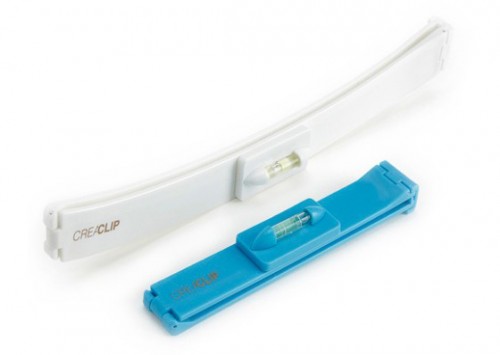
Creaclip Creaclip set Cut your own hair at home with professional results. For easy and precise cuts everytime! Great for cutting children's hair, trimming bangs, creating layers, or just maintaining a hairstyle between cuts-anytime, any place!
- One small CreaClip - For short hair and bangs
- One Large Curved CreaClip- For long hair and layers
CreaClip -cut your own hair at home with professional results. For easy and precise cuts everytime! Great for cutting children's hair, trimming bangs, creating layers, or just maintaining a hairstyle between cuts- anytime, any place!
- Save Time and Money
- Trim your Bangs
- Create Layers
- Cut Children's Hair
Rotating Level -For balanced and precise cuts everytime
Teeth- Evenly combs and distributes the hair
Lock- Secures hair in place while you cut
Website http://creaproducts.com
Reviews
I'd had my last trim about 6 months ago, so my ends were desperately in need of a little tidying up!
The CreaClips arrived in the mail, packaged in simple clear plastic packaging with a cardboard back and separately packaged were a pair of hair scissors (thankfully, as I wasn't sure what we were going to have to use). There wasn't too much info printed on the packaging, it just showed different ways of using the clips but thankfully there were easy to follow instructions included inside the package and the CreaClips can be used with scissors, razors or trimmers.
I was a little worried about how this clip was going to stay in my hair, as my hair is naturally very straight and very fine. The instructions say to use the clip on clean, dry hair, so I washed it and blow dried it before we began. I'd managed to convince my hubby to cut and photograph my hair as we went, as my hair is all one length and it would have been difficult for me to cut it myself.
After brushing it to make sure there were no knots or tangles, he placed the CreaClip in my hair, making sure that it looked like a smile (curvy ends facing up), placing it close to the base of my neck before securing the little clasp on the end. A comment that the clip is made for left handed people and it would have been easier if the clasp was on the other side of the clip!
After checking that the spirit level was straight (and commenting that it's quite viscous so it takes a while for the bubble to move, which is a good thing as it makes them less sensitive to very slight movements), he slid the clip down to the relevant length, leaving the amount of hair we were going to chop off sticking out underneath. I'm not a fan of a very straight across blunt cut, so he tried to give me textured ends by doing vertical cuts. I think this was easier said than done, as I don't have much hair (with it being very fine) and this was the first time he was ever cutting hair! But it doesn't look bad and is a little less harsh that a dead-straight across cut.
Overall, it was very quick and easy to use, although in saying that, the clip did slide in my hair. He noticed about halfway through the cut that the spirit level was no longer level and had two try push the clip back up so that the cut ended up being even instead of lopsided. Once he'd finished cutting the ends, he wanted to leave the clip in my hair and quickly take a photo but the clip slid right off my hair in a matter of seconds!
Is it a good product? Well, if you're like me and have natural, undyed hair that's all one length, so the only time you ever go to a hairdresser is for a trim, then yes. It really bites me when I have to pay an expensive amount for a 5 minute trim! Don't expect miracles though, this is an at-home product, so the cut is going to be rather blunt unless you practice making textured ends with vertical cuts and eventually get that right.
Tips: If you have naturally straight, fine hair, keep an eye on the level while cutting the hair to make sure that the clip isn't slipping down on one side!
The man refers to me as "the Jew" when it comes to money, I say, why pay for something I will hate when I can hate what I've done at home for none of the price!? I was stoked that the trial choosing gods smiled upon me and my cheap ways.
First things first, the white one looks like a giant smile! There are two CreaClips in a pack, a curved white one and a straight, shorter blue one. Both have small teeth like a comb to help disperse the hair as you pull it through your hair. I was ecstatic to find that the profesh hair dressing scissors had been included in a cute little pouch. Now I can stop using sewing scissors! The day it arrived I decided to go in blindly. I obviously knew better than the instructions so I didn't read them. I took the little blue clip and the scissors and got to work separating my fringe from the rest of my hair. Like most times I cut my hair, I separated my fringe into two parts and got to clippin' and snippin'.
WHY DIDN'T I READ THE INSTRUCTIONS. Or at least look on YouTube for a video! I had cut my hair just under my eyes, roughly 5cm lopped off. It wasn't straight, it was janky and crooked and looked like I'd given the scissors to my 3 year old niece and she went ham on it. I walked sheepishly into the living room and onto YT and found a video and went back to it. Now my fringe is above my eyes and only slightly crooked - but I can and will be pushing it out of my face half the time so I'm not bothered by it being slightly crooked. Plus I can just claim it's "edgy"!
I tried the white one next for the rest of my hair. I have an issue with these clips, and that is to me they are backwards, and the clip is on the wrong side so I can't see the air bubble leveler. I flipped my hair forward and put the clip at my scalp and pushed it down to the length I wanted and snipped away. No immediate change, so I did it again. The man helped gather some more of the back and handed it to me to cut... Mild success. It was a bit crooked so he straightened it up.
I used the blue one to cut my hair so it would "shape" my face more, but I think I did it wrong, so I went between the clip and freehanding to get it a bit more shapier, which kind of worked. Without a bit more knowledge behind me on how to do it, I won't be trying it again. The man is on the fence about my hair and is waiting for when I start crying and complaining - I won't though, as I actually quite like the new 'do!
So does it work? Yes, if you have someone on hand to help. Yes if you're looking for a trim. For a full haircut I don't think I would use it again, unless someone was using it on me and had watched several videos and had a general idea of what they were doing. For touch ups and fixing what the hairdresser has made me hate, YES! So this product may be a bit gimmicky but it works if you know what you're doing! Thank you for the opportunity BR, and I hope you don't laugh too hard at my photos!
Tips: Look up videos before cutting, they are literally a life (hair) saver!! I straightened my hair for my hair cut but this of course is optional and you don't need to - as long as it's been brushed I think that's all that matters!
I bought this set of clips a couple of years ago. I'd heard great things about them so I googled to see where I could buy them from. All that came up was the simple savings website in Australia. I can't remember exactly how much I paid but I do know they were cheap on the site but the postage to me from Australia was quite expensive. In total though, it probably came to less than $40 all up.
You get two in a pack. A large white one (around 30cms long) and a blue one which is about half the size. You can use the blue one for cutting fringes but as I don't really do that, I just use the big one. It is curved slightly and has a little air bubble leveller on it so that you can make sure it's even. To use with these, I bought some hairdressing scissors off Trademe. They were pretty cheap, I'm sure not salon quality but they are sharp and do the job.
I use this on my own hair and also to cut my daughters. To do my own hair, I really recommend doing it wet and making sure it's all combed out nicely. Instead of combing your hair down your back, you want to bend your head forward, and comb your hair all towards the front. Once you have done that, you need to open the clip up and get all your hair in it. It's always best to start off with trimming a shorter amount as you can always go back and trim more but obviously can't add your hair back on if you cut too much! Once you have all your hair spaced out evenly and it's levelled, you can start cutting. It really is as easy as that. Once you have cut all the way across, comb your hair back the right way and you can see if there are any little bits that need a little extra trim and make sure both sides are even. It is important to do this step, but it's nothing major that you are fixing, just little bits that need tidying. When you are doing someone else's, hair, it is a bit easier as you don't need to comb their hair forward over them.
I do have long hair and just like the simple layers that this gives me, I'm not sure if I'd feel as confident doing shorter hair but I'm sure it would be fine. You need to think about something like this as not a magical tool, you won't get a super fancy haircut with it. If you just want to give yourself trims or just basic layers and to save yourself money, then this is for you. If you like having the latest fashion haircut, then this wouldn't be what you need!
Tips: I'd really recommend searching this up on youtube so you can get a basic idea of how to do it. It's also important to make sure you have the curve facing the right way when you cut. You want your hair longer towards the middle of your hair so you need to make sure it curves up like a smile! (I made this mistake once so had to go shorter than I originally planned!)
This has literally saved me THOUSANDS of dollars in visits to the hairdresser!! I am a serial layers gal and I have been using the creaclip for over 10 years. And I have never had a problem with it. Not only does it give me the best layers, but also using the mini creaclip, I get the prettiest side-swept bangs.
I have long thin frizzy hair.
The jist of it is basically this. for layers you brush your hair out, flip it over your head (so its hanging down in front of your face) take the clip and "scoop" the hair up making sure its even and lock it.. you then slowly pull it down to the length you want to cut it, make sure the level is straight and start snipping away under the clip. I recommend snipping away bits rather than cutting straight across for a more feathered look.
You can also do more stylised hair do's; (like bobs or blunt cuts) but that is something I have never tried before, if you're curious check out the website or YouTube.
This product is honestly soooo amazing, you are literally paying a one off price for a life long thing!
Tips: Get someone you trust to do it for you if you aren't confident about doing it yourself. Search YouTube for tutorials. Always use super sharp scissors or a sharp buzz cutter.
I didn't even know that these were around until there was a mention in a forum here. I watched a YouTube clip and they seemed to good to be true.
I found mine on trademe. Not sure where you would normally buy them from. I have long fine hair. I had grown my fringe out and wanted a fringe.
Opened the small clip up, gathered my soon to be fringe to the middle of my forehead, put the small clip around the hair at the roots, then slid it down to the length I wanted. There is a level that makes sure you have a straight line.
Then use SHARP scissors, cut very fine snips at 45 degrees to the clip (below the clip not above). Once you get to the end, the clip just slides off. Walaa brand new fringe! It honestly took me longer to section the hair than cutting.
I have used this multiple times on my fringe and you can get different looks by holding at different angles.
The same goes with the large clip on hair. Not sure how it works on short hair. You would probably need a friend to help you. I wash my hair, when it's wet, I put the clip in. I get whoever is around to make sure the level is straight and they cut along to get that perfect straight line. It's So easy to get different looks, lift it away from the head for layers etc
Tips: Don't cut straight along the line of the clip, use a angle and super sharp scissors.
I bought these full of excitement at the time as I am quite a fan of DIY hair cutting and anything that helps to get a good cut by yourself I am up for. Unfortunately these aren't the miracle clips that they are made out to be I ended up with a butchered fringe and very squared off layers with these I do much better with the old pony tail over the head trick than these to get good even layers. The leaflet that came with these makes it look so easy - that you slide down and cut, but I had to make repeated cuts and found it bevelled out in areas and looked really obvious that I had cut it myself. I haven't tried using these for asymetrical fringes or side fringes but these may work well for that purpose. I generally just need to trim my fringe and give my hair some layers to stop it from weighing down and I can get that easier from more traditional methods.







As a student I am all for doing things at home cheaply, but well. The Creaclip is definitely a handy tool to have at home to help maintain your hairstyle in between hair cuts or to give yourself a really simple hairstyle at home. I used the small clip to restyle my fringe. I think the most important part is figuring out how much hair to cut in terms of how wide and thick you want your fringe. It was a little bit tricky to hold and cut at the same time but at least my hair wasn't slipping out of the clip. The little comb teeth hold my thick hair in quite well.
I tested out the large clip on both my own thick hair and on my friend's thin hair and to try different styles. On myself, I attempted to give myself layers. I followed the instructional video on their website and added a few long layers to my hair, and I think they worked pretty well. It was a bit hard to do this on my on and I probably would have preferred having someone help me out, but definitely manageable. As my hair has a bit of a natural curl it hasn't shown me if I cut unevenly. The scissors provided in the kit are really good quality and worked really well. (Quite sharp so try not to cut yourself like I stupidly did!)
I also tried out the large clip in my friend's hair. she has thinner hair than me and we straightened it first so that we could do a straight across cut. Although her hair is thinner than mine it didn't slip out of the clip, however, the cut didn't happen as even as I would have liked. It is a bit awkward cutting with the scissor across such a thick clip instead of a thin comb. The great thing is there is a level on both the clips which made it easier to know if I was cutting straight.
Overall I would definitely recommend this as an option to maintaining your hairstyle at home. If you're like my mum it will prevent you from giving your kid a wonky fringe. I wouldn't exactly describe it as professional results but it is better than freehand if you have no experience cutting your own hair. I would definitely pay retail price for this as it is the same cost as 1 haircut for me at the hairdressers. I will still be going to the salon when I want a complete style change though
Tips: Have someone help you cut if you are wanting to use it on yourself. Also check out the how-to videos on creaproducts.com.