I purchased this from a big bucket deals sale with the blue Ferris Wheel nailpolish. Everything you need to do the manicure comes in the pretty box, the base polish, colour, tweezers and two pottles of flower petals to stick onto your nails. The box that I purchased has large blue flowers, large red flowers and smaller purple ones.
The first time I tried this, I tried to follow the instructions and put on two coats and I found the nail polish colour a bit light for my liking and so I let the two coats dry and added a third as a base for my flowers to stick to. I then used the tweezers to pick up the flower petals and placed them onto my nails that were still slightly wet and pressed them in a bit to help them stick and waited a few more minutes for my nails to completely dry. Then I added the top coat and waited for that to dry. The instructions stated that you file the stray edges but I didn't like that idea so I used nail clippers to tidy up my strays. I also painted another top coat onto my nails after that. I found my first attempt more complicated than it needed to be and now I plan where the flowers are going to be placed and pre-cut them. Also, I found the end result quite lumpy with the flower petals which caused me to unconsciously pick at the flowers so I use a more generous amount of top coat after placing the flowers. This is a great set and quite simple to use.

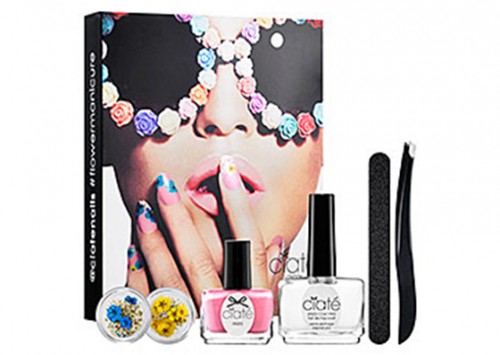






I was gifted this set (because I picked it out and was standing next to my mother, who bought it) for my birthday, and it was about $20 because it was from one of the Big Bucket sales that come around a few times a year.
The box is nice and secure, and when you open it up, you see the kit, a multi-lingual novel brochure and a cute message from Charlotte. I have the color Ferris Wheel, which is a gorgeous pastel blue (differs from the picture) along with blue and red flowers, and purple spindling flowers. It also comes with tweezers, to get the flowers out of their pots and help with placement, a top coat, and a nail file, to file the nail edges if the flower overlaps, or just general upkeep!
The instructions say to apply two coats of the color, and to let it dry completely, which I did, and it took about 6 minutes for both coats. Two coats is barely opaque so if you're one of those people who have to have solid colors, either keep painting or try another color! The next step, after waiting the dry time, is to apply a generous amount of top coat and begin placing your flowers on. If the bottom color isn't dry, you'll definitely know about it when you put the top coat on.
The flowers are the fiddliest part of this! It drove me insane, if I'm honest! I am doing a nail as I type, and decided to not do a 'generous coat' of the top coat, only painting where I would put the flower. It worked so much better and the flower doesn't move around too much, so I will stick to that method from now on.
The purple flowers are the most annoying, as they are small little buds with hard sort of sticks still attached, and I don't like them. When I put them on, they don't stick down, and then when they're dried, the feeling of the flower on my nail irritates the hell out of me and I find myself taking it all off. Cutting the little buds off seems to help, and it looks a lot better than sticking the entire thing on.
Applying a second top coat, over the flowers, and the base still moves with the top coat, which is super annoying. The yellow buds that were quite prominent on the blue flower have now disappeared and lie flat on the flower, you can see them if you look closely. I'll continue to use these polishes with or without the flowers, and then use different polishes with the flowers. It's a really cute kit and I'm glad I was gifted it!